What is augmented reality (AR)?
Augmented reality—also known as AR—is an interactive digital experience anchored in a real physical environment. Using a camera, virtual objects are anchored to a physical point in your surroundings. As the camera moves, the virtual objects continues to look and feel as it would if it existed in the physical space, maintaining the correct scale and offering a 360-degree view.
Unlike VR (virtual reality), you don’t need a headset or other wearable technology to interact with your virtual objects. All you need is a smartphone camera. Additionally, VR makes the natural space completely altered by virtual components, while AR alters the natural space by adding or taking away specific components. With AR you’ll still recognize your physical surroundings, while with VR you will not.
Augmented reality is useful because it changes the way we’re able to interact with the world around us. It alters our perception of what’s in front of us, allowing for a more immersive experience of the natural space.
How does AR content work for e-commerce?
In the e-commerce space, there are clear business implications. One challenge of e-commerce selling is that customers are typically unable to physically interact with your product offering. They can’t see it or touch it, which can make it difficult to understand details that may factor into the purchase decision. Understanding something like a product’s true color or its scale compared to other objects can be difficult in an online-only marketplace.
AR mitigates this challenge because it places your product in your customer’s physical world. It bridges the gap between e-commerce and an in-store shopping experience, delivering all the benefits of online presence with the added bonus of a more realistic experience.
Additionally, customers can place a product within the context they’ll actually use it, providing a benefit over even in-store shopping. For example, IKEA uses AR for customers to play with layouts, sizes, and spacing when choosing furniture. Rather than taking measurements and attempting to visualize those measurements in your space, you can see exactly how a sofa or piece of art will fit in with the rest of your pieces.
AR also has customer retention benefits. When customers buy with confidence in the products they’re choosing, and when they’ve engaged with the brand in a novel way in the process, they’re more likely to perceive their shopping experience as positive. They’re also less likely to make returns based on problems like a product not working out for its intended use or placement. Those details are evaluated beforehand, so there are fewer surprises when a customer gets a product into their home.
Why should I start creating AR content?
Firstly, AR is largely built for mobile devices, which can allow brands to take advantage of the way mobile content has exploded in use and adoption over the last several years. Mobile-first content isn’t going anywhere, and AR helps you stay ahead of that curve.
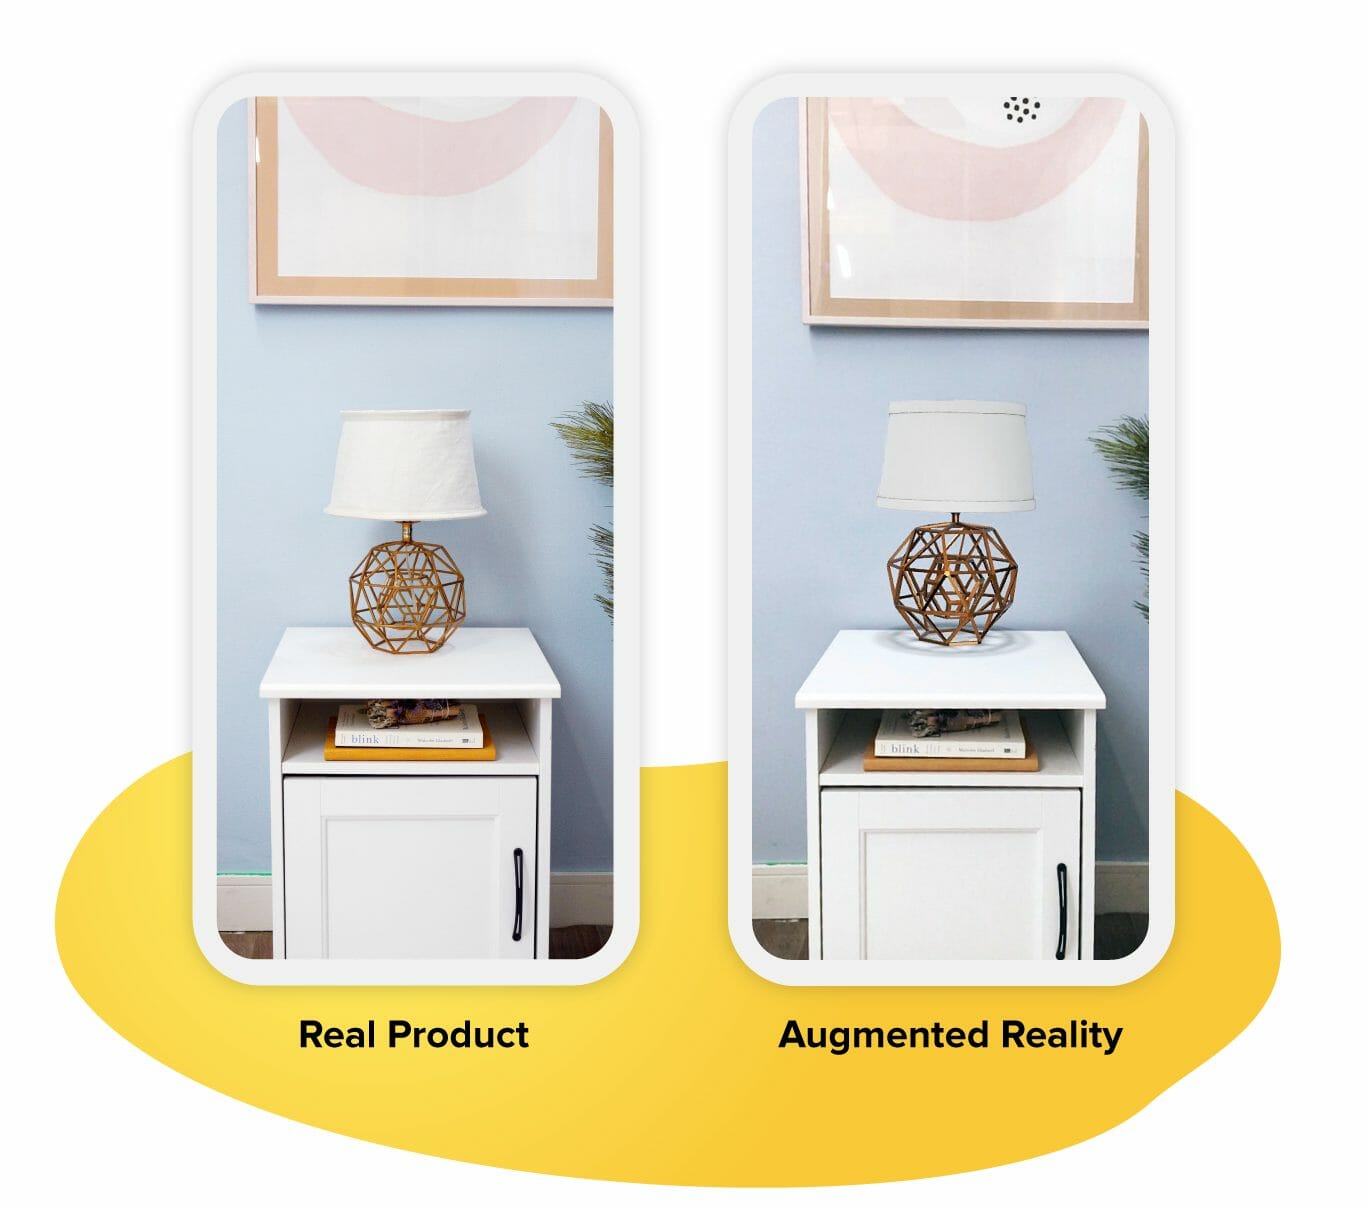
Second, AR is still more or less in an “early adoption” phase, meaning that brands can still capitalize on the newness of the concept. If you’re skeptical about the accuracy of AR content, check out the graphic below. During a recent webinar, we polled audiences to ask which lamp they thought was the AR example, and the answers were completely split! As you can see, the AR version of the lamp is virtually indistinguishable from the actual, real-life product shot.
What are the steps to creating your own AR content?
How to Create a 3D Model
The first step—and most important step—in creating AR content is developing your 3D model. The model is the essence of your AR content, and it’s what allows viewers to interact with your content in a scalable, accurate way.
To create a 3D model, you need high-quality images using orthogonal views. Orthogonal views mean that the viewer’s eyes are centered on one side of the object. It’s a 2D view of a 3D object that just captures the shape of a single side, without any perspective of the rest of the object.
For 3D models, you’ll capture photos from this view for each side of your object. If you’re creating AR content of a chair, for example, you’ll take one photo that captures from the back, then the right side, then the front, then the left side. You’ll also need photos from above and below to capture the full range of motion of the AR functionality.
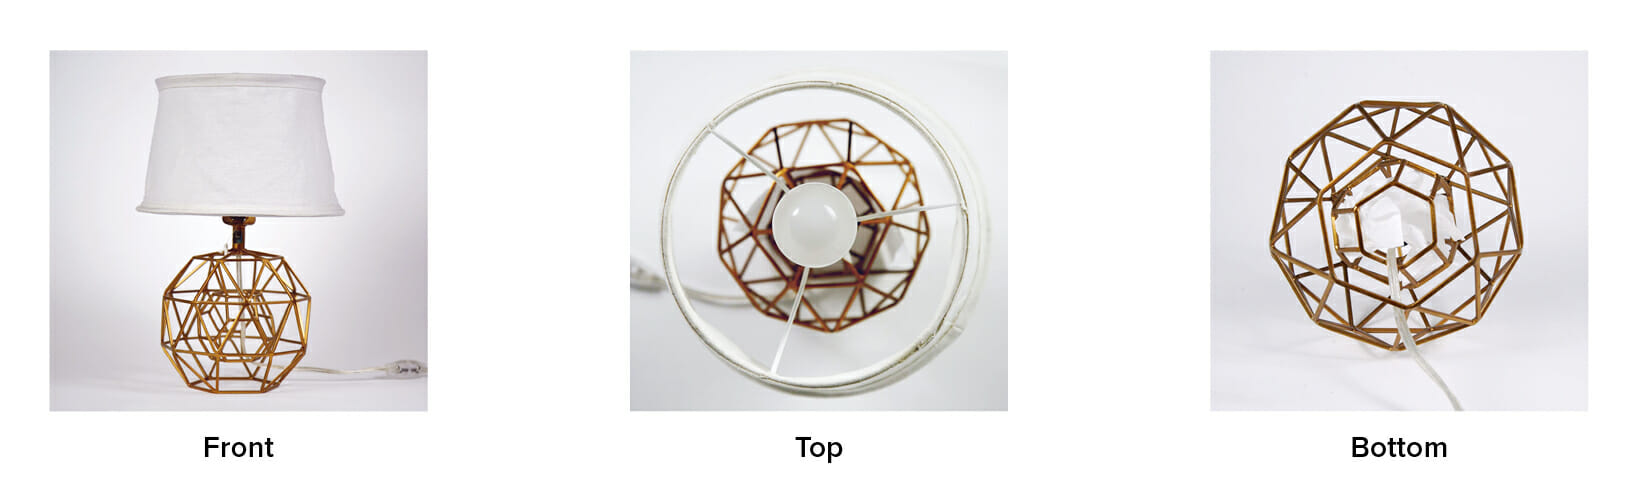
When you take these photos, there are a few tips to keep in mind. Use a high-contrast, evenly lit white background as you capture each side of your product. You may also have to swap out your camera lenses for the best view, depending on the size of your object. For small products, use a 70 mm or 100 mm lens, while larger products should be shot with a 50 mm lens. Lastly, take extra photos of any product details like textures or unique details, and make sure to label all your photo files accurately.
Next, you’ll need the exact dimensions for your product. By taking the measurements, your model will accurately reflect the product’s size and it will scale according to the viewer’s space.
Then, you’ll provide a 3D modeler with the product photos and the dimensions, and they’ll create the full 3D model in a software program like Maya, our choice at Lemonlight. Other options are Cinema 4D, Zbrush, and Blender (a free option from Pixar).
If you decide to move forward with this process yourself, the most important thing is that you have the right file type. Your best option is a glTF file (.gltf) for a textured model. Your three options for file types are .usdz, .gltf, and .glb.
While the process of turning your photos into a 3D model is challenging, you may be able to do it yourself if you’re familiar with the software and modeling process. If not, it’s almost always best to leave this particular part of the process to a professional. You’ll save time by outsourcing, and when your 3D model is especially high-quality, you can actually repurpose it for product imagery, social media posts, and other types of content. Low quality models may be “good enough” for the AR environment, but they won’t hold up for these other use cases.
To see our 3D model for yourself, go to your phone’s camera and scan this QR code:

How to Upload Your 3D Model to Shopify
Uploading your 3D model will depend on the platform that you’re integrating your model with. On Shopify, for example, all you do is upload your 3D model file to your Shopify store, and the platform takes care of the rest.
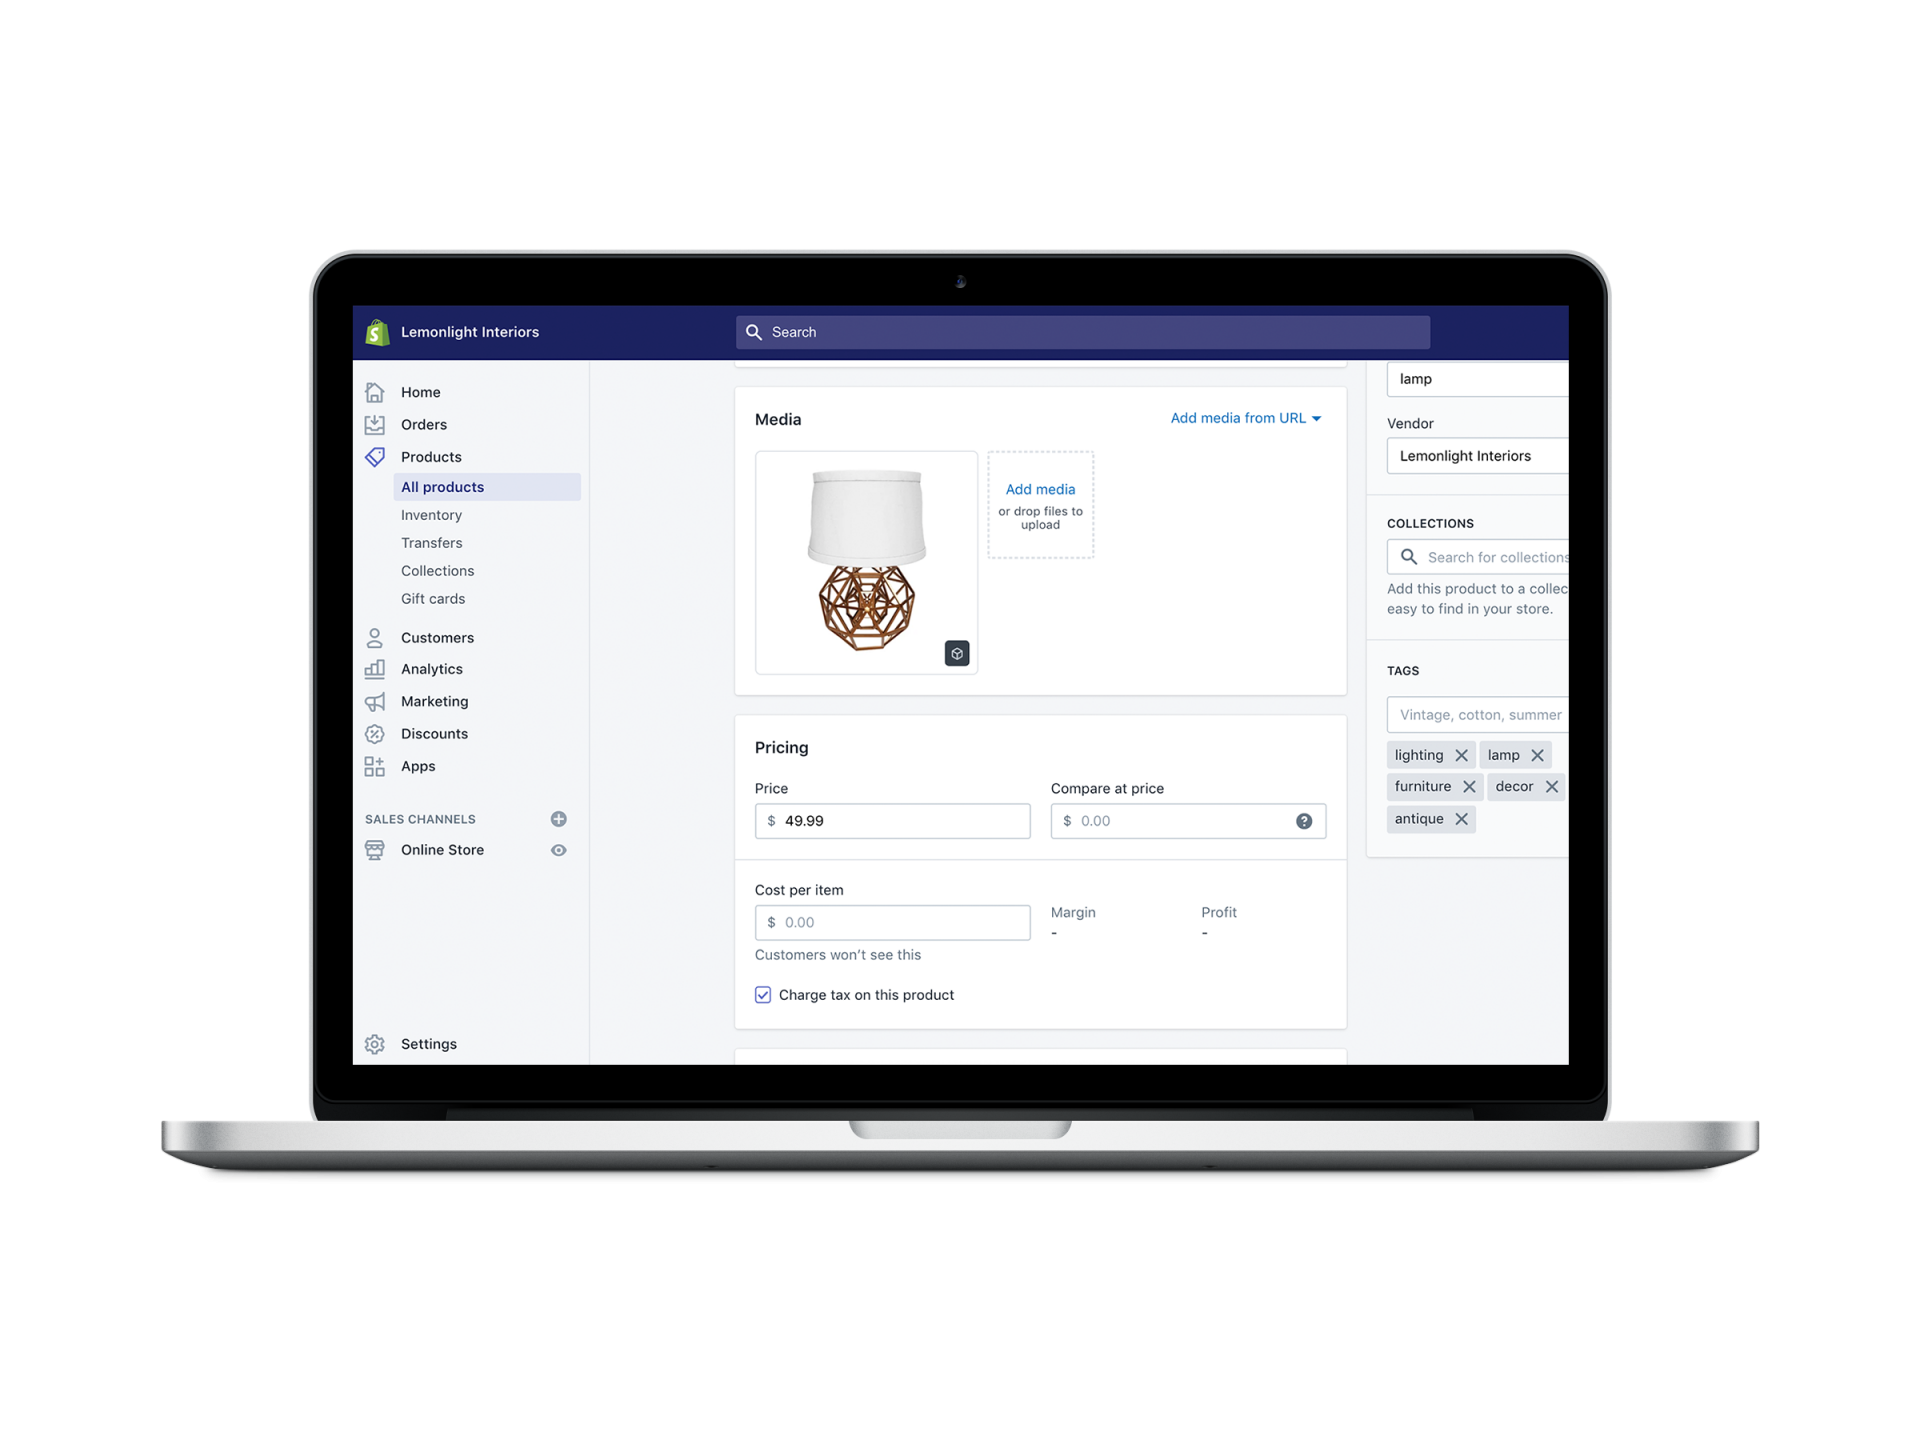
Here are the specific steps to upload a 3D model to Shopify:
- From your Shopify admin, click on “Products,” then “All Products.”
- From the Products page, click the specific product you want to add your model to.
- In the Media section, click “Add Media” and select the 3D file to upload.
- After your file is processed (which typically takes a minute or two), your 3D model will automatically appear on your product page.
Here are a few notes to keep in mind as you upload your 3D model. Before adding your model to Shopify, you’ll need to make sure that it’s in one of the acceptable file formats that we mentioned above (.usdz, .gltf, .glb).
From a consumer perspective, users will have to be viewing your site on a smartphone to be able to use the AR feature. Otherwise, they’ll be able to view the 3D model itself (they can view all product angles, zoom in and out, and view product details) but they won’t be able to test the product in their own space.
The best part? Shopify offers this AR integration to all customers—you just have to make sure you have the most up-to-date Shopify theme. You can modify your current theme by following the instructions in the themes tutorial.
You can also add a 3D model to these other platforms that offer AR integrations, including Amazon, Facebook, Google, Snapchat. The upload process for each of these platforms is similar to that of Shopify. Rest assured that the upload step is the simplest part of the AR execution process!
Who should I hire to help with creating AR content?
When creating AR content, if you’d rather outsource the process, there are two parts to consider. The first is the product photography itself, which doesn’t necessarily have to be connected to the entity that does the other part—the 3D model.
Many companies are capable of taking high-quality product images in-house, and they choose to outsource just the 3D modeling part of the process. Other companies want to outsource both elements. In either case, the process of uploading the model itself is simple on most platforms.
Here are some factors to consider when deciding how to approach your AR project. The pricing for the 3D model itself is usually broken down by complexity. For our team at Lemonlight, a simple product will start at around $100, while an especially complex product will start at $1,000.
Complexity depends on a few factors: size, symmetry, number of details, uniformity of color and texture, to name a few. In general, a basic mass-produced product will be on the simpler side, while a detailed handmade product will be more complex. Note also that if you have multiple color options for the same product, swapping out the color is simple.
When you’re searching for a partner, make sure to find someone who is familiar with the technical details involved in the process, and ideally find someone who is familiar with uploading to your intended e-commerce platform. (For Shopify, you can find Lemonlight on the Shopify Experts page as an authorized partner!)
Conclusion
AR might seem complicated now, but it’s becoming more user-friendly and accessible every day, and now is a great time for brands to get in the game. You might be surprised at how it elevates the look and feel of your products and the signal of professionalism that it sends to prospective customers.
Because of the case-by-case nature of 3D modeling, a useful path forward is often to check in with a company who can execute the model for you to request a quote. This will give you the most accurate idea of the complexity of your project and the cost and timeline involved. If you’re ready to take that step, give us a call for a free consultation!


