[Editor’s note: This article was updated on 8/1/23 to reflect updates to Instagram and TikTok’s approaches to captions.]
For today’s video content, adding closed captioning (CC) or subtitles shouldn’t be an optional step or an afterthought. It’s important to make sure that every video you create is accessible to its intended audience, and adding captions is one feature that makes a big difference.
The benefits of adding closed captions are clear. Most importantly, the CC text allows you to share your content with deaf or hard-of-hearing viewers. It’s also helpful for viewers who speak another language, viewers who consume content with their phones on silent, and even for search engines, which have an easier time understanding what your content contains when there are text captions.
In other words, adding closed captions to your content is critical and improves the video experience for a number of reasons. Unfortunately, each video-supporting platform has its own process for adding closed captions to video content, and some platforms don’t even have a CC option within the user interface.
For content creators, this leads to a frustrating dilemma: It’s important to add closed captions to videos, but figuring out the process by platform is time-consuming and often less than intuitive. That’s where we come in.
We’ve created this guide to walk you through the CC process on many of the most common platforms: YouTube, Facebook, Instagram, LinkedIn, Twitter, and TikTok. We’ll share what the native process is like within the platform itself, any tips and tricks you need to know to make your life easier, and finally, some tools to look into if you want to try to automate closed captioning
Let’s dive in!
YouTube
We’ll start with YouTube, which has a decent (albeit sometimes time-consuming) closed caption feature. First, the good news. YouTube actually adds captions to your content automatically, meaning that when you upload a video, viewers will have the option to toggle captions right away. The bad news? Auto-captions aren’t always accurate (averages fall in the 60-70% range), especially if the audio is low-quality, there’s background noise, speakers talk over each other, or speakers have accents.
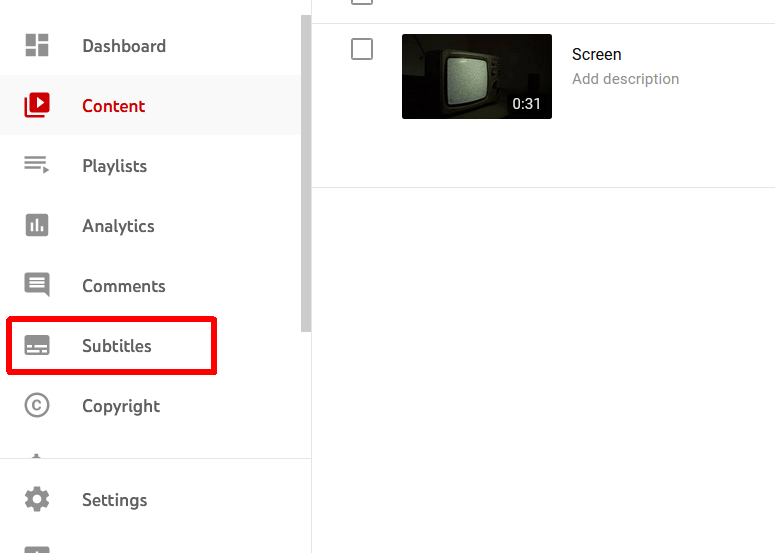
To get to the area where you can adjust your captions, click “Edit Video” then navigate to the section that says “Subtitles” on the left side bar (see image below). From there, you’ll see YouTube’s automatically generated captions. If, when you watch your video, YouTube’s captions are perfect, you can leave everything alone. However, most videos will have a few small corrections. To make edits or updates, click “Duplicate and Edit” on the right-hand side of the screen, and you’ll be taken to YouTube’s closed captioning interface.
YouTube is pretty good at automatically aligning the text with the timing in the video, so in many cases, you can just look through the text that YouTube has generated and correct any errors as you go. If your video was scripted, you can also copy-paste your script into the text box (although you should watch the video to make sure what was scripted is actually perfectly followed in the video).
If you want to adjust the timings themselves, you have that option, too. Just click “Assign Timings” and you’ll be able to edit both the caption text and the time (in seconds) when that text should appear.
When you’re done, you can use the on-screen video player to watch the video back and make sure everything lines up the way you want it to. Then, when you’re comfortable with the captions, click “Publish” and you’re done!
Next, let’s talk about Facebook. Facebook’s process is similar to YouTube. It has a tool that auto-generates captions, and you can view the output and make edits to both the text and the timing. On Facebook, the closed captions will only play automatically if viewers are watching the content with their device on mute, but the option to toggle the captions is also available when sound is on.
Note that the process for adding captions differs depending on whether you’re running a Page (a business or organization’s account, usually) or your own personal account.
On your personal account, you can only adjust the captions after the video has already been posted—you don’t get the option to review the captions in the process of uploading the video. Then, your option for adding captions is to upload a SubRip (.srt) file. (See below for more info on how to create a SubRip file.) Facebook gives detailed instructions for uploading your .srt file on its website.
On a Facebook Page, your options are a little different. After your video has been uploaded (but before you post it) you’ll see an option on the right-hand column called “Subtitles and Captions.” Within that screen, you can either upload a SubRip file or review Facebook’s auto-generated captions and tweak them as you would on YouTube. Here’s what that looks like.
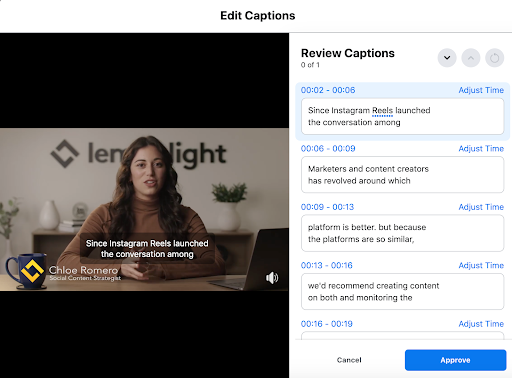
When you’re done reviewing and feel good about the final product, click “Approve” and move through the rest of the video publishing process as usual.
Instagram’s auto-generated captions are extremely useful as they eliminate the need for manual transcription and caption overlays. To effortlessly enable or disable captions while crafting your post, follow these simple steps:
- Begin by either uploading a video from your gallery or shooting a new one right within Instagram.
- After applying any desired edits to your video, access the menu that appears just before you’re ready to post.
- Within the menu, locate and tap on “Advanced Settings.”
- Look for the “Accessibility” option and toggle the “Show Captions” feature to your preference.
- Don’t worry if you forget to enable captions before posting your video; you can always turn them on afterward.
Should you ever need to modify captions for a posted video, merely tap the three dots situated in the top-right corner of your video and then select “Edit.” Instagram ensures a seamless experience for creators, making caption management a breeze!
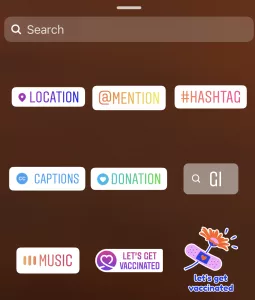
For Instagram Stories, the landscape is a little different. To access captions on Stories, record your video, then click the icon that looks like a smiling face (fourth from the right in the image below).
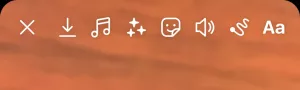
From there, you’ll see the following menu, which usually allows you to add location tags, music, and other stickers and overlays. Captions are now one of those options. Just click the “captions” option on the left, and you’ll see text auto-generated for your video.
LinkedIn falls somewhere in the middle of Instagram and Facebook/YouTube when it comes to the ease of captioning. Unlike Facebook and YouTube, it doesn’t have an auto-generated caption feature, but unlike Instagram, it does support closed captions.
The process here requires you to create and upload a SubRip file. Our favorite trick for generating a SubRip file, especially if you’re posting your content on multiple platforms, is to use either Facebook or YouTube as a middle man. When you upload your content to Facebook or YouTube, it automatically generates the SubRip file for you—that’s how the auto-caption feature works.
So, you can move through the process of posting your video to one of those platforms first, then download the .srt file that is automatically generated.
Once you have the file, take it straight to LinkedIn and upload it as your caption file there. We do this for our content at Lemonlight, and it works well for our captions (and saves time compared to creating the SubRip file from scratch).
If you don’t want to go this route, you can also use the third-party services we mentioned earlier to generate the .srt file for you. Rev is our favorite tool overall, and VEED works decently well if you want a free option. (Rev and 3PlayMedia are often seen as the industry leaders.)
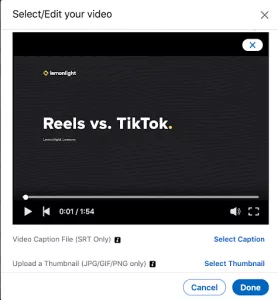
When you have your SubRip file, here’s how to add it on LinkedIn. When your video is uploaded, click “Edit” and then “Select Caption” where you’ll upload the .srt file. Then click “Done” and you’re finished!
Twitter presents another unique scenario for adding captions. It only allows SRT file uploads if you have access to Twitter’s Media Studio (which you have to apply for) or when posting a Twitter ad. If you don’t fall within those two categories, your only option is to encode captions into your video before you post like you would on Instagram.
Here’s a recap if you need to go that route: either your editors need to add the captions to the video file before it’s completed, or you can use a third-party service to burn in the captions after the video file is already created.
Once you have your open captions added, upload the video as you usually would without worrying about any caption features. Since your captions are in the video itself, you don’t have to add anything after the fact.
TikTok
Finally, TikTok! TikTok’s audience is especially unforgiving when it comes to skipping captions, so you’ll definitely want to include this step as part of your content creation process.
Your first option on TikTok is to manually add the captions as on-screen text. This is what many creators do because you have the most control over the final product, although it is time-consuming. If you want to go this route, click the “Text” button at the bottom of the screen and then type your captions manually. It’s a good practice to begin your text with “CC:” so that viewers understand that the text is a caption, not additional unrelated text.
Be mindful of where you place this text, too. If you put it too low on the screen, the caption for the video will overlap with the on-screen text, making both more difficult to read. The same goes for putting it too high on the screen, where it will overlap with the tabs that say “Following” and “For You.” Your safest bet is to place it in the middle of the screen whenever possible.
Alternatively, you can use the trusty third-party services to create the captions. Apps like Clipomatic and Mixcaptions are commonly used by TikTok creators, and the services Rev and 3PlayMedia that we mentioned earlier can also tackle TikTok captions.
Ultimately, we hope to see more closed captioning features offered within these platforms themselves over the coming months and years. Since YouTube and Facebook make it so simple to auto-generate captions, the tech exists—it’s just not the industry standard as of right now. Until we see widespread adoption of auto-generated captions, these workarounds will help to ensure that your content is accessible to all audiences.


