When you see a bad, low-quality video, it’s hard to put your finger on what exactly makes it bad. Honestly, it can be anything from the sound, to the camera angles, to poor acting or artistic direction. But more often than not, it’s something as simple as lighting.
Lighting has the power to affect everything from the quality of a video to the mood a viewer feels when they watch it. That’s why it’s crucial to get your on-set lighting right from the get-go.
Today, we’re breaking down a few video lighting basics to get you ready for your next video marketing shoot.
Three-Point Lighting
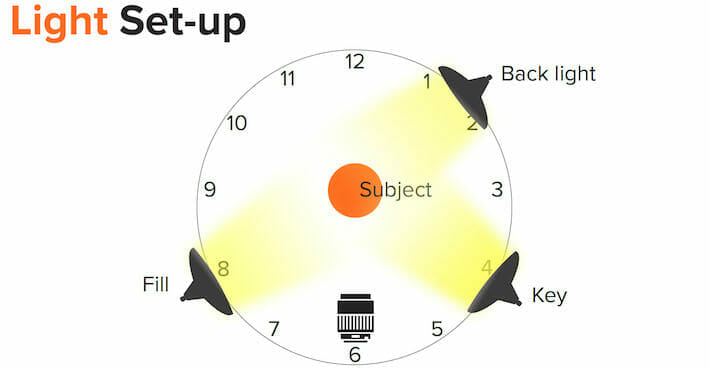
One of the most fundamental lighting setups, three-point lighting should be used anytime you’re filming an interview or someone speaking on camera. It uses three lights: a key light, a fill light, and backlight.
A key light is the primary light used to highlight your subject. It’s the heavy lifter and helps form dimension and details on your subject’s face. It’s usually pointed at a 45-degree angle in front of your subject to the right or left of the camera.
Your fill light is your second batter up. It helps offset and diminish any shadows on your subject’s face caused by the key light. It should be less intense and placed opposite the key light, also in front of your subject on the other side of the camera.

Finally, your backlight is used to separate your subject from the background, creating depth and dimension. It’s the brightest light of all and should be placed behind your subject, also at a 45-degree angle.
Using Natural Light
Natural light actually just refers to natural sunlight. It’s the light you use anytime you shoot outside during the daytime and comes with pretty great advantages (and some disadvantages).
Because soft light, or light that doesn’t cause harsh shadows, is the best light to shoot in, it can make using natural light difficult for most productions. The sun and sky can be pretty unpredictable, so if you plan on using the sun’s rays as your main source of light, you want to be prepared with the proper filters and diffusion.
Shooting in the shade is a great way to use natural light without overexposing your subject. Clouds can also provide great diffusion with little effort on your part. And if you want the perfect soft natural lighting, shoot during golden hour. This is the time around sunrise and sunset that provides the softest light, least amount of shadows, and warmest color hues.
Just remember – natural light changes quickly, so if you’ve got a particularly long shoot, don’t rely on it to always be perfect for your needs.
Indoor Lighting
Lighting an indoor scene in a narrative or lifestyle video can be tough. If you’ve got a low budget, you might be tempted to just use whatever organic lighting sources are already available. This can work, but can also result in a low-budget production that looks, well, low budget.
The number one rule to remember for indoor lighting is: avoid contrast if you don’t have the proper lighting kits to do contrast properly.
Harsh overhead lighting, for example, can cause raccoon-eye shadows on your characters’ faces. Bare lightbulbs alone will also cause haphazard shadows.
Low-Key Lighting
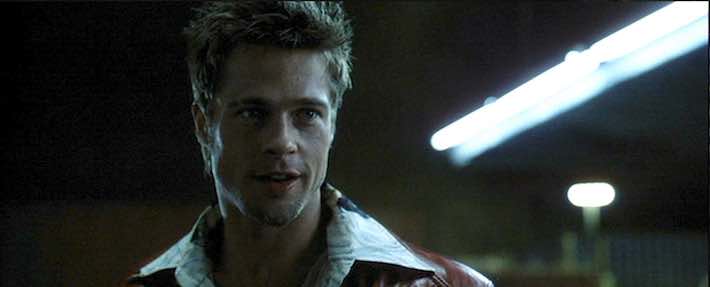
If you’re going for a dramatic feel, on the other hand, low-key lighting can be your best friend.
Low-key lighting uses one single light source to purposefully accentuate shadows and contrast. This lighting can be absolutely beautiful, but tends to be a lot more emotional and serious.

Practical Lighting
One of the best ways to use the indoor light is through practical lighting, which means you take advantage of the lamps, light sockets, candles, and other lighting sources within a scene.
This is especially useful when you’re shooting a bedroom, hotel, kitchen, restaurant, or other indoor location and you want the scene to look as close to reality as possible.
Here, you want to make sure your light sources aren’t giving off different types of light, for instance a mix of incandescent, LED, and fluorescent. To make the most of these light sources, replace all the available bulbs with similar bulbs that give off the right light temperature and strength to fully light your scene.
Studio Lighting
Want studio lighting no matter where you’re shooting? Then you’re ready to invest in professional lighting kits!
Depending on your budget, there are tons of options available. Check out our affordable recommendations here and, if you want something a little more professional, we love Wistia’s lighting equipment breakdown which you can check out here.
Conclusion
Getting your lighting just right sounds difficult, because, honestly, it is. That’s why we often recommend hiring a production crew that can meet all your lighting and sound needs without your having to worry about the specifics.
In the end, hiring a crew is more cost effective. You get all your production day needs met and end up with a beautiful video and none of the hassle.
But setting up your own lighting is definitely possible. With the right equipment and the right video to match, you can create an exciting, captivating video in no time.


